End-to-End Data Pipeline Series: Tutorial 6 - Orchestration

Welcome to the fifth post in a series where we’ll build an end-to-end data pipeline together - from scratch!
- Introduction to End-to-End Data Pipeline
- Data Storage with MinIO/S3 and Apache Iceberg
- Data Ingestion with Meltano
- Data Transformation with DBT and Trino - Part 1
- Data Transformation with DBT and Trino - Part 2
- Data Orchestration with Dagster (this post)
- Data Visualization with Superset
- Building end-to-end data pipeline with Sidetrek
If you want to view the code for this series, you can find it here. To view the progress up to this post, you can check out the orchestration branch.
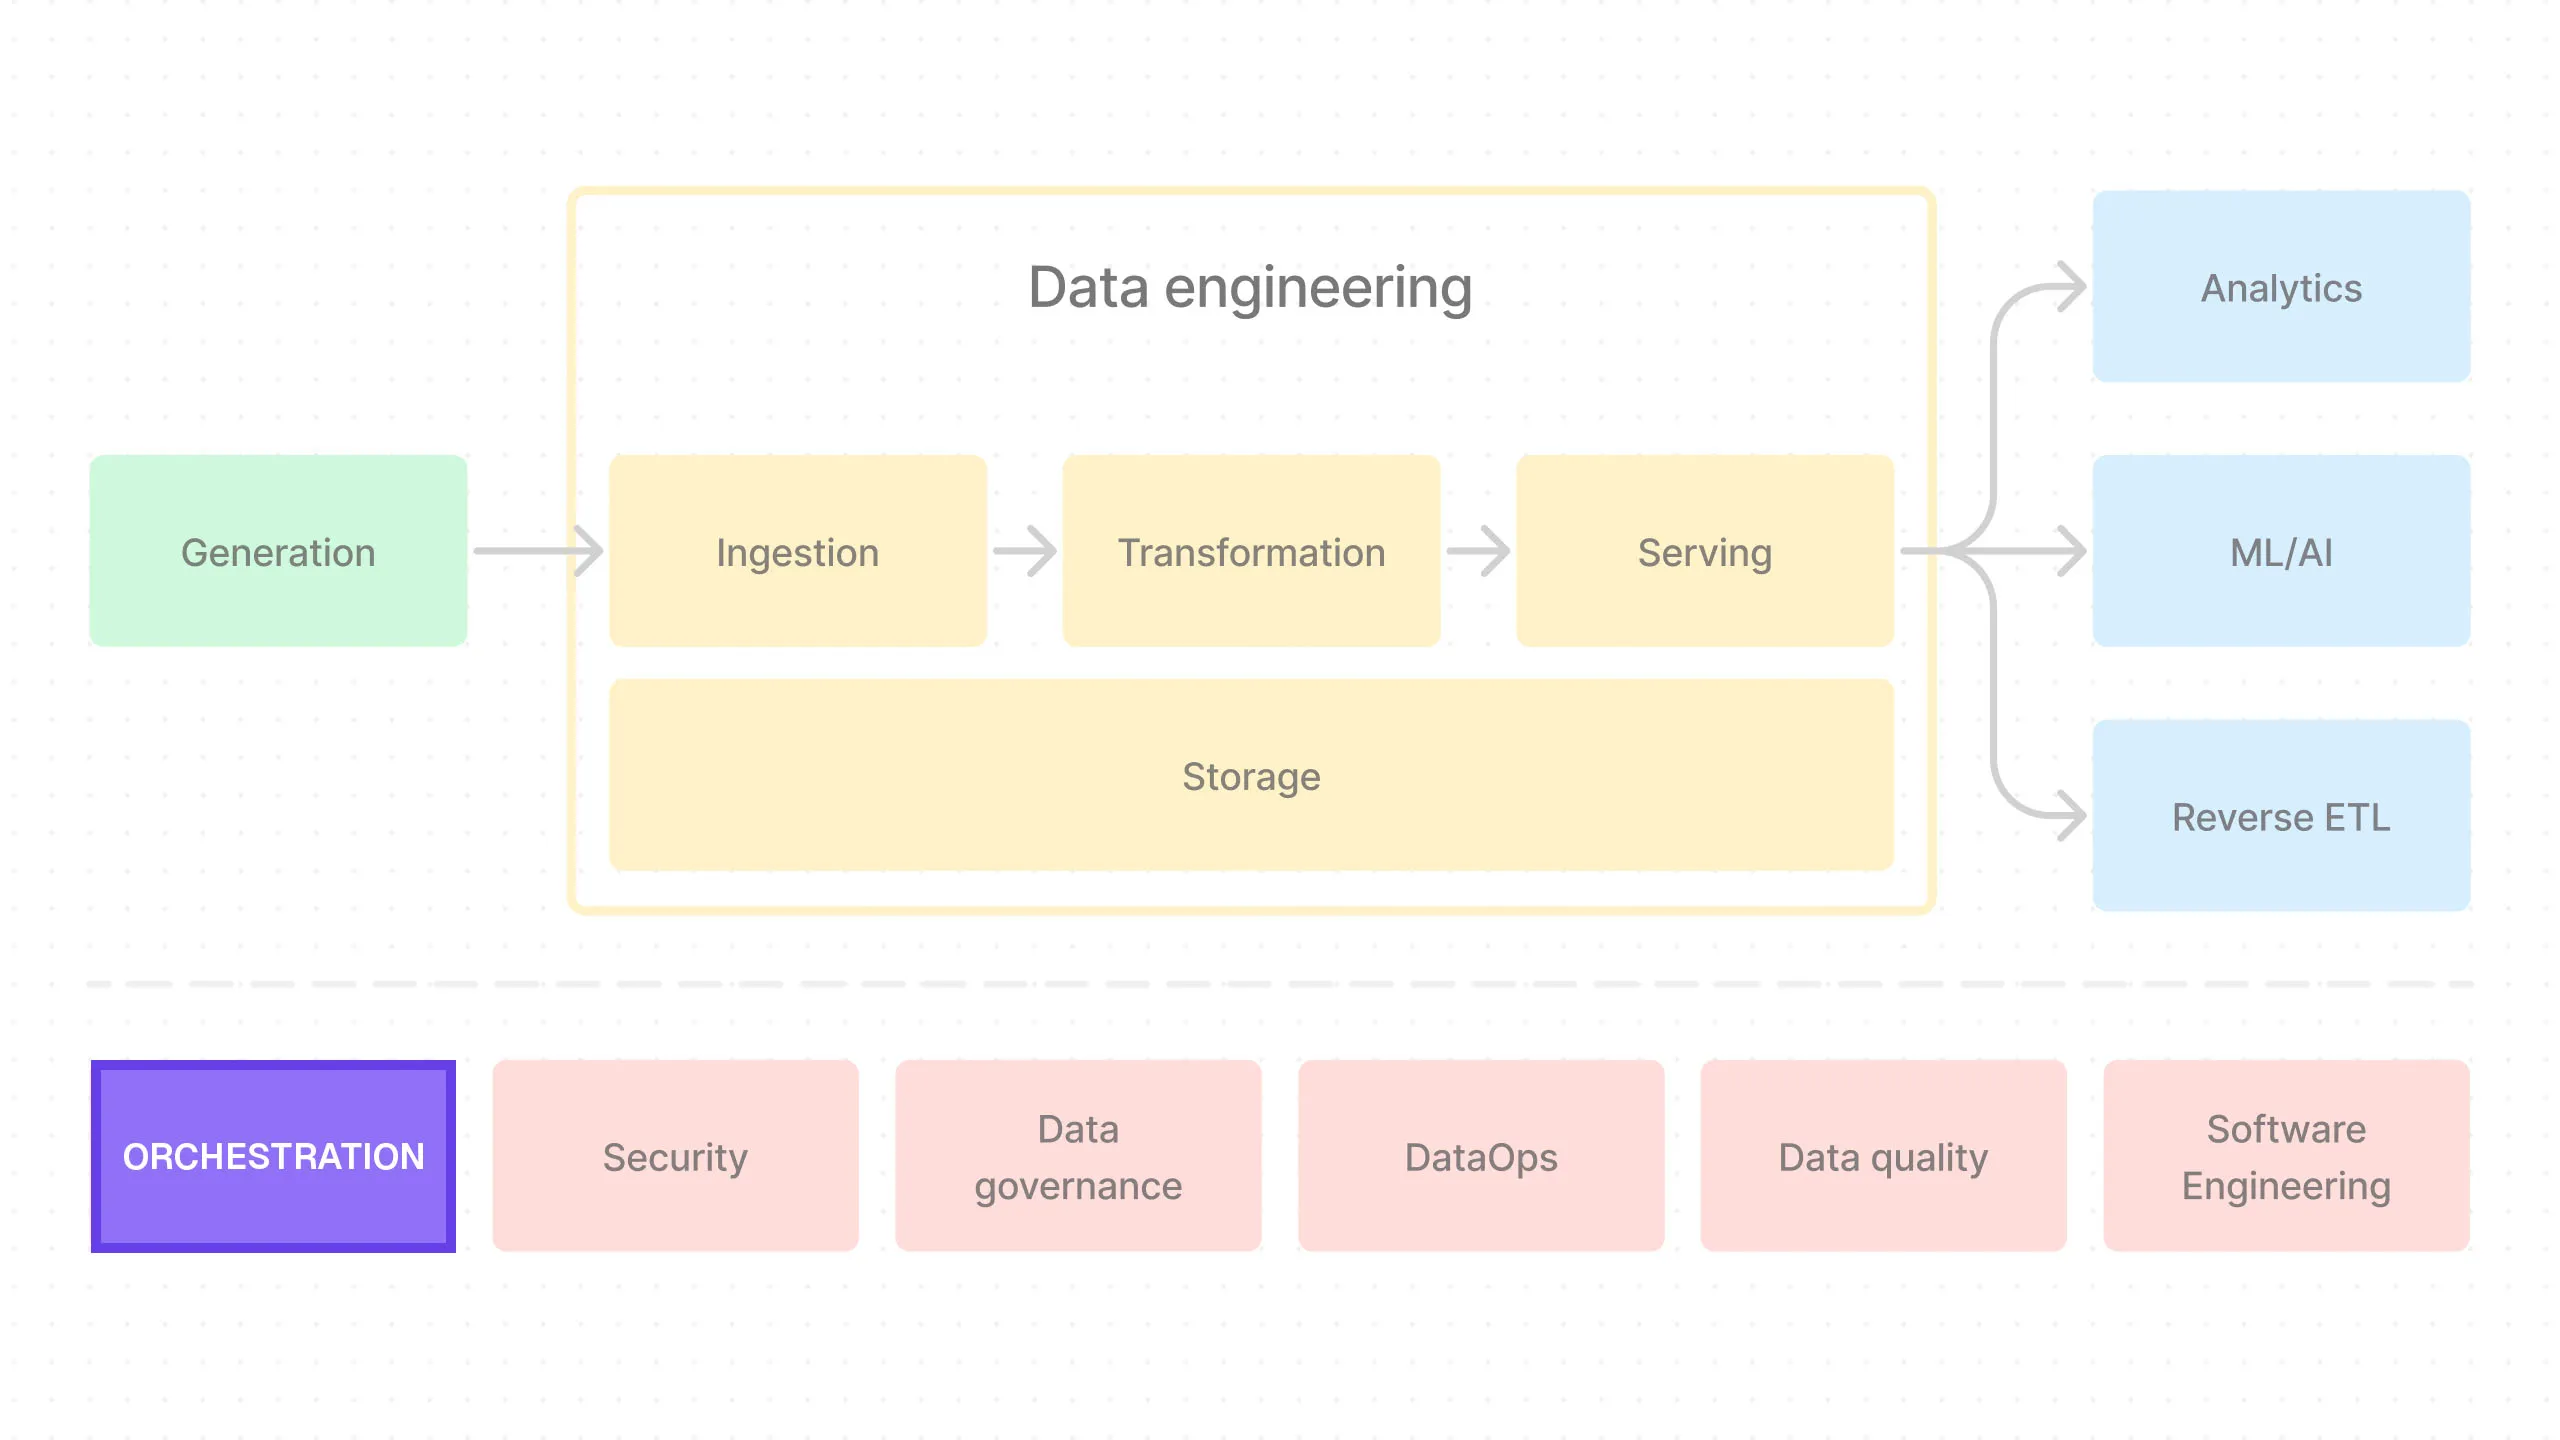
Today, we’re going to work on the orchestration part of the pipeline.
What is Orchestration?
Orchestration is the process of coordinating the different parts of a data pipeline. This is where we schedule the tasks, monitor their progress, and handle any failures.
Ideally, we would wrap our entire data pipeline with an orchestration tool that manages the entire process end-to-end.
In practice, this isn’t always possible, but when we do, it allows us to visualize all data-related jobs in one place — within the orchestrator. We’ll see what this looks like when we set up Dagster.
Why Use an Orchestrator?
It’s not immediately obvious why we need an orchestrator. After all, couldn’t we just run the tasks manually or use a cron job to schedule them?
You certainly can, and maybe should, if you have a very simple project. But as the project grows, you’ll find that this quickly becomes unmanageable.
Imagine having 100 tasks that need to run in a specific order. You could write a script to run them sequentially, but what if one of the tasks fails?
You would need to set up your system to identify the failed task, configure retries for temporary failures (like Internet connection issues), and establish timeouts and notifications.
Then there’s the issue of data freshness. These queries need to be scheduled to run at specific intervals. If you have multiple queries with different schedules, you must ensure that your downstream jobs don’t work with stale data because the upstream jobs they depend on have a longer cadence.
All of this becomes very complex to manage effectively — and that’s why we use an orchestrator.
Dagster
Our choice of orchestration tool is Dagster.
This might seem like a curious choice, given that Airflow is the most popular orchestration tool in the data engineering world. So, why Dagster?
Why Dagster?
Airflow is battle-tested, and many people already have some experience with it.
Having said that, Airflow is showing its age and is hamstrung by its core architecture. We can’t cover all the details here, but for example, when setting up Airflow for production use cases, you’ll find it difficult to get it to work in your local environment. This forces data engineers to test in production, increasing the risk of production issues and slowing down iteration speed.
Isolating dependencies in Airflow can also be very challenging, and it’s complex to deploy and manage.
More modern alternatives have been created to address some of Airflow’s shortcomings. We’re particularly interested in Dagster because it aims to learn from software engineering best practices. For example, it offers a local development environment for faster iteration and safer testing. It’s cloud-native, which means deployment and management are relatively simple, and you can have a better CI/CD process. It’s also declarative, rather than imperative.
If you’re not familiar with the idea of declarative vs imperative designs, we encourage you to look it up. We won’t delve into the details here, but there are many advantages to the declarative paradigm. Note that many winning technologies have embraced declarative over imperative - examples include ReactJs for web development, Terraform for DevOps, and Kubernetes for container orchestration.
Set Up Dagster
OK, let’s set up Dagster in our project.
Install Dagster
First, we need to install Dagster.
Make sure you’re in the project root directory and then run the following command in your terminal:
Initialize a Dagster Project
As a reminder here’s the project directory structure we’re going for:
e2e_bi_tutorial
├── .venv
├── superset
├── trino
└── e2e_bi_tutorial
    ├── dagster
    ├── data
    ├── dbt
    └── meltano
So let’s cd into the inner project directory.
Then we create a dagster directory and cd into it.
Now we can initialize a Dagster project.
OK, let’s cd into the dagster project directory:
Let’s add .gitignore:
/history
/storage
/logs
Add Meltano
Now that Dagster project is set up, we need to connect Meltano so we can run our Meltano ingestion job inside Dagster.
To do this, we need to first install dagster-meltano package.
But first, make sure you’re back in the project root directory:
Then install the dagster-meltano package:
Now cd into Dagster project’s inner project directory:
You should be in /e2e_bi_tutorial/e2e_bi_tutorial/dagster/e2e_bi_tutorial/e2e_bi_tutorial where __init__.py and definitions.py is (I know it seems crazy to have so many inner directories, but this is a Python convention due to its import system).
Now we need to add the Meltano connection code. Create a new file called meltano.py and add the following code:
import os
from pathlib import Path

from dagster import job, Config, RunConfig
from dagster_meltano import meltano_resource, meltano_run_op


meltano_project_dir = str(
    Path(__file__).joinpath("..", "..", "..", "..", "meltano").resolve()
)

class MeltanoJobConfig(Config):
    project_dir: str

# Must provide meltano project dir as Dagster runtime config so dagster can find meltano
default_config = RunConfig(
    resources={"meltano": MeltanoJobConfig(project_dir=meltano_project_dir)},
)

# Example usage of meltano run op
@job(resource_defs={"meltano": meltano_resource}, config=default_config)
def run_csv_to_iceberg_meltano_job():
    tap_done = meltano_run_op("tap-csv target-iceberg")()
It looks like there’s quite a bit going on, but really it’s just creating a Dagster job that runs meltano run tap-csv target-iceberg command.
The details of different Dagster entities like op, asset, job, resource, etc. are outside of the scope of this tutorial, but you can learn more about them in the Dagster documentation. Dagster has good documentation, so we encourage you to check it out.
Also, if you want more details about how Dagster and Meltano works together via dagster-meltano, you can check out the dagster-meltano blog post.
Finally, we have to add the Meltano job to __init__.py. Replace the contents of __init__.py with the following code:
import os

from dagster import Definitions

from .meltano import run_csv_to_iceberg_meltano_job


defs = Definitions(
    jobs=[run_csv_to_iceberg_meltano_job],
)
__init__.py here is the entrypoint for Dagster where all the entities like jobs, assets, and resources are defined.
Since we’re defining the entrypoint here, we don’t need the definitions.py file that Dagster scaffolded for us. You can delete it.
Why Go Through All This Trouble?
You might be wondering why we’re going through all this trouble to run a simple Meltano job. Why not just run the Meltano job directly via Meltano CLI?
The reason is that we want to automate the meltano job. We want to be able to run it on a schedule, monitor its progress, and handle any failures.
Connect DBT
Let’s also connect DBT to our Dagster project.
We need to install the dagster-dbt package, but make sure you’re in the project root directory first:
Then install the dagster-dbt package:
Now cd back into the Dagster project’s inner project directory (where __init__.py and meltano.py is):
Now we need to add the DBT connection code. Create a new file called dbt_assets.py and add the following code:
import os
from pathlib import Path
from dagster import AssetExecutionContext
from dagster_dbt import DbtCliResource, dbt_assets


dbt_project_dir = (
    Path(__file__)
    .joinpath("..", "..", "..", "..", "dbt", os.environ["PROJECT_DIRNAME"])
    .resolve()
)
dbt = DbtCliResource(project_dir=os.fspath(dbt_project_dir))


# If DAGSTER_DBT_PARSE_PROJECT_ON_LOAD is set, a manifest will be created at run time.
# Otherwise, we expect a manifest to be present in the project's target directory.
if os.getenv("DAGSTER_DBT_PARSE_PROJECT_ON_LOAD"):
    dbt_manifest_path = (
        dbt.cli(
            ["--quiet", "parse"],
            target_path=Path("target"),
        )
        .wait()
        .target_path.joinpath("manifest.json")
    )
else:
    dbt_manifest_path = dbt_project_dir.joinpath("target", "manifest.json")


# This builds the dbt project and creates dagster assets
@dbt_assets(manifest=dbt_manifest_path)
def dbt_project_assets(context: AssetExecutionContext, dbt: DbtCliResource):
    yield from dbt.cli(["build"], context=context).stream()
All this is doing is creating Dagster assets for all the DBT models in the project.
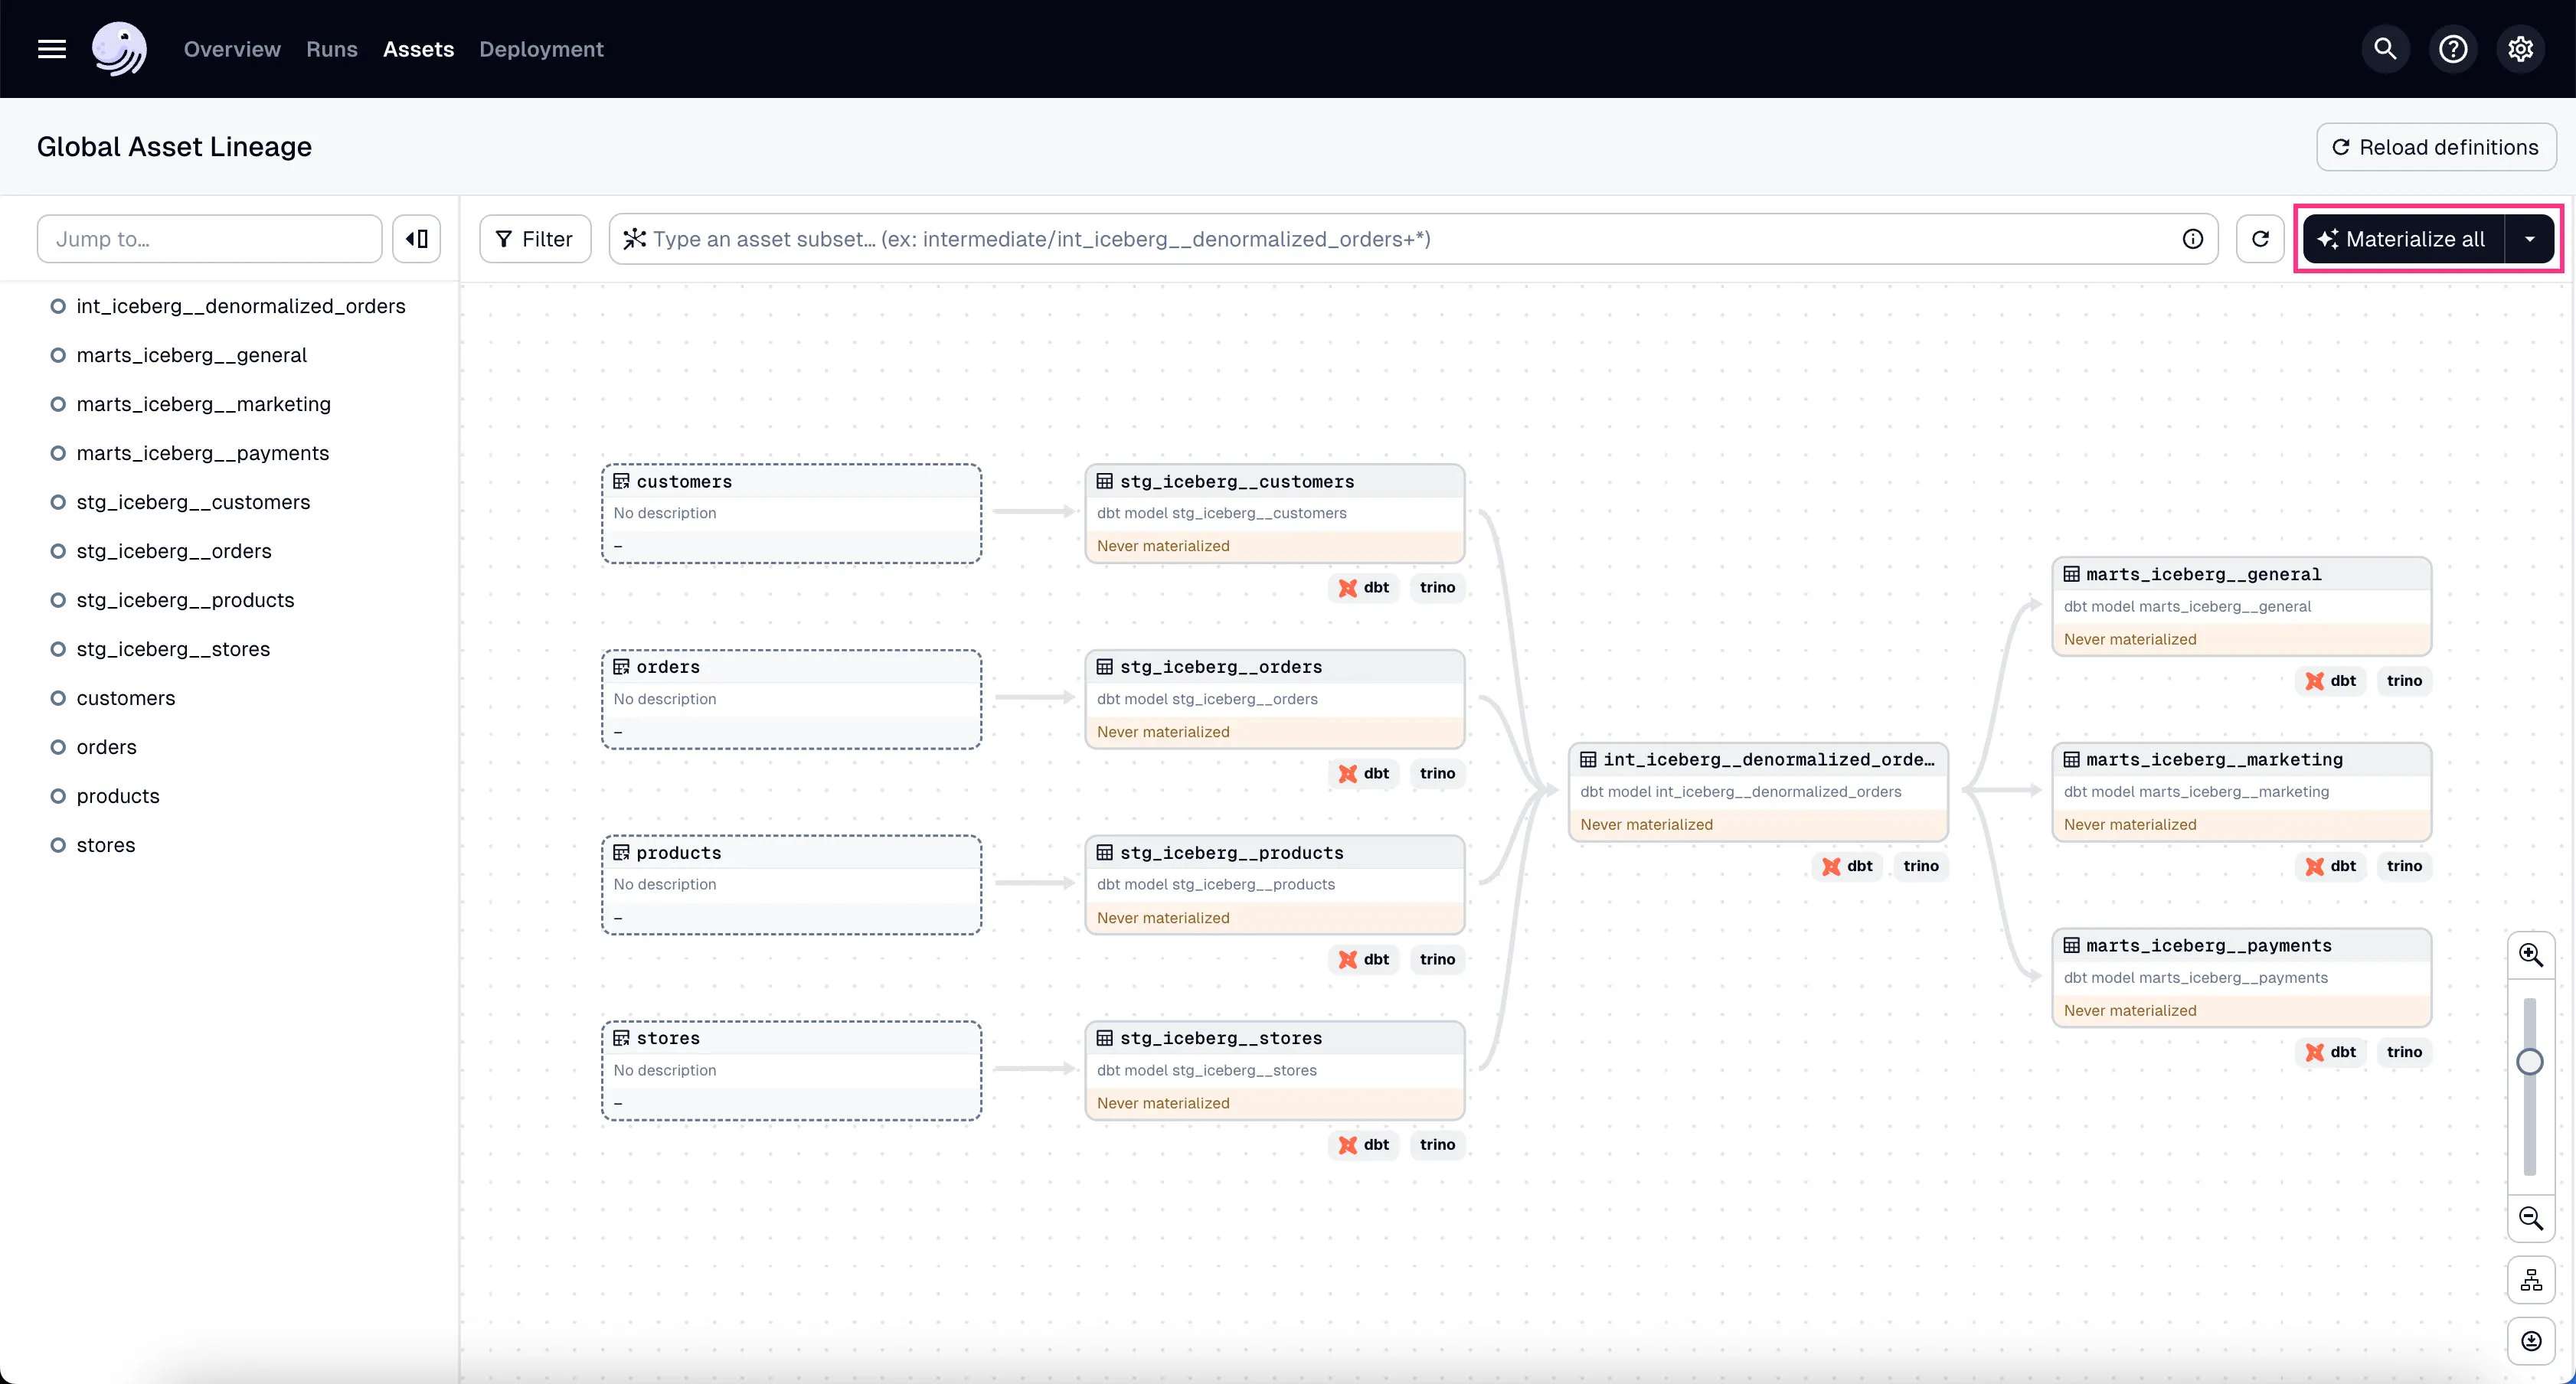
Dagster integrates deeply with DBT and can not only understand the dependencies between individual models, but also we get this nice data lineage graph that shows how the data flows through the pipeline.
The above implementation is straight out of the dagster + dbt tutorial in Dagster documentation, so feel free to check it out if you want more details.
Add Env Variables
You’ll notice in the above code that we’re referencing PROJECT_DIRNAME environment variable. We need to set this environment variable in the root .env file.
Move out to the project root directory:
Then add the following to the .env file:
PROJECT_DIRNAME=e2e_bi_tutorialAdd DBT Assets to Dagster
OK, now let’s cd back into the Dagster’s inner project directory:
Now we have to add the DBT assets to __init__.py. Replace the contents of __init__.py with the following code:
import os

from dagster import Definitions
from dagster_dbt import DbtCliResource

from .dbt_assets import dbt_project_assets, dbt_project_dir
from .meltano import run_csv_to_iceberg_meltano_job


defs = Definitions(
    assets=[dbt_project_assets],
    jobs=[run_csv_to_iceberg_meltano_job],
    resources={
        "dbt": DbtCliResource(project_dir=os.fspath(dbt_project_dir)),
    },
)
For more information on how to use Dagster, check out the Dagster documentation.
Run Dagster Server and UI
Before we can run dagster dev command, we need to add something to the end of our root pyproject.toml file:
...
[tool.dagster]
module_name = "e2e_bi_tutorial.dagster.e2e_bi_tutorial.e2e_bi_tutorial"
Since our project has many tools besides Dagster, we need to specify the Dagster module name so that Dagster knows where to look for the entrypoint file (__init__.py).
Also, let’s make sure all other docker services are running.
In the project root directory, run:
Now we’re ready to run Dagster Server and UI.
In the project root directory, run the following command to start the Dagster dev server and UI:
The environment variable there is to make sure that Dagster parses the DBT project on load. This ensures that Dagster is not running stale DBT models.
Now you can open your browser and go to http://localhost:3000 to see the Dagster UI.
Voila!
Run Meltano Ingestion Job
Now that we have Dagster running, let’s run the Meltano ingestion job.
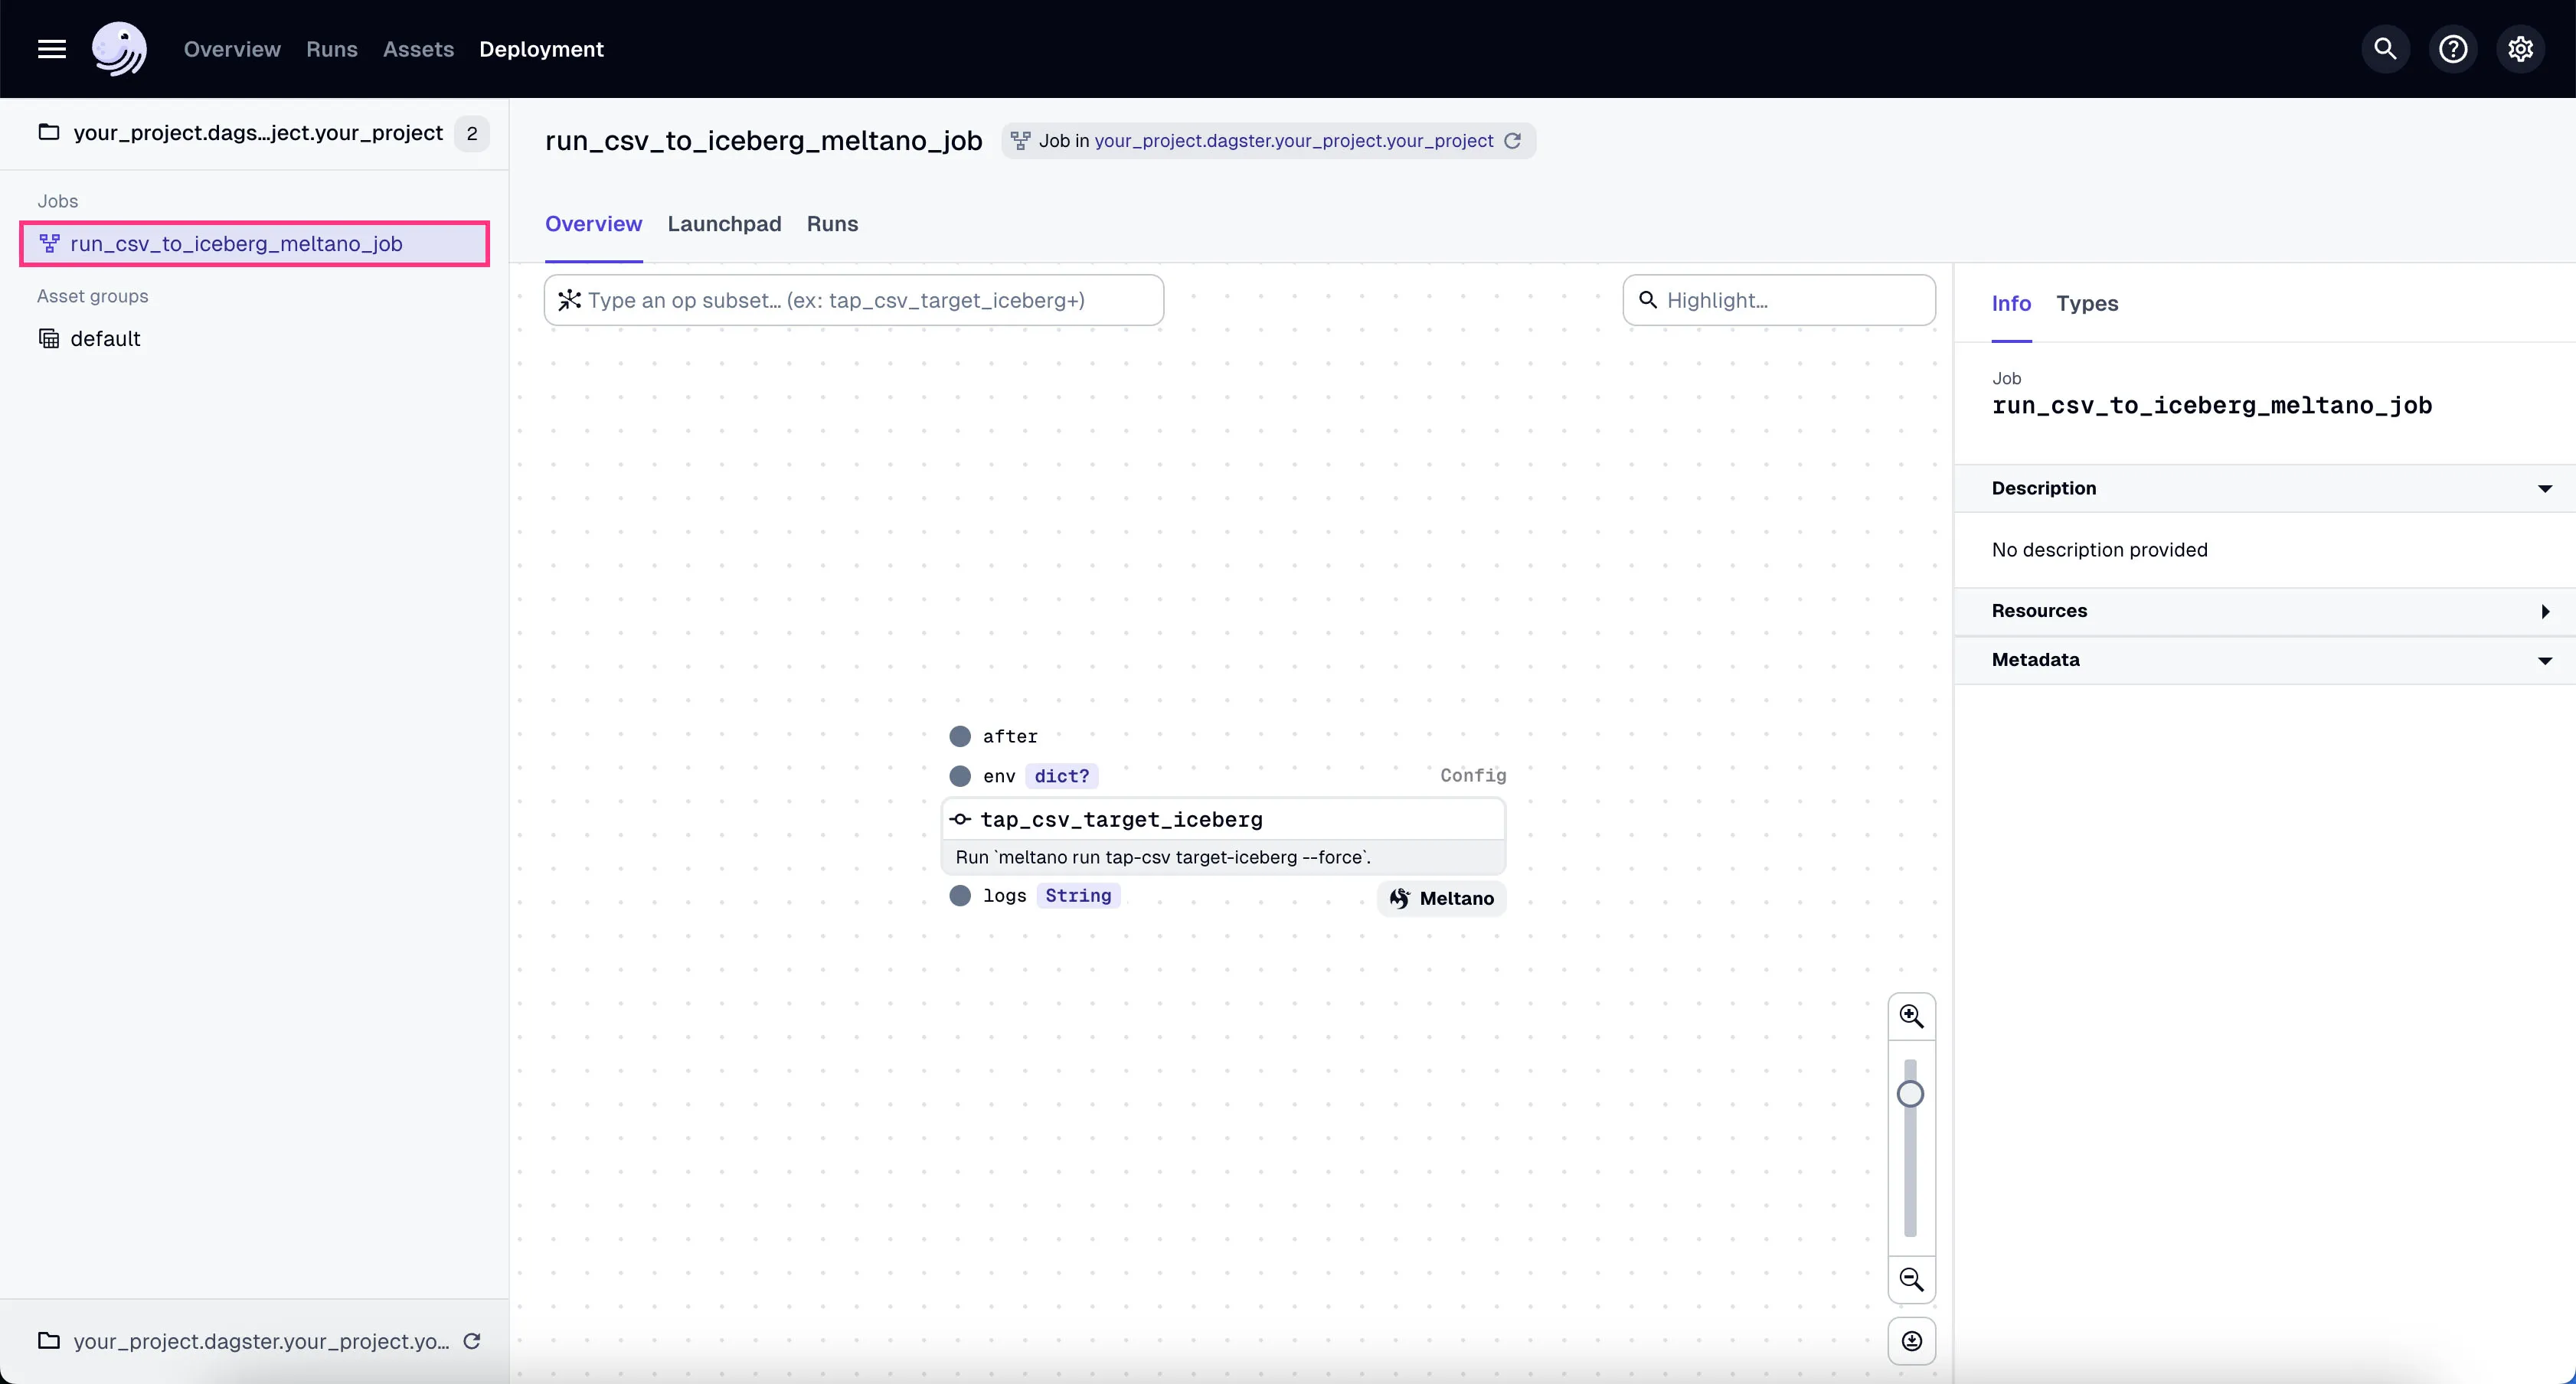
- Go to the Dagster dashboard at http://localhost:3000 and click on the
run_csv_to_iceberg_meltano_jobjob.
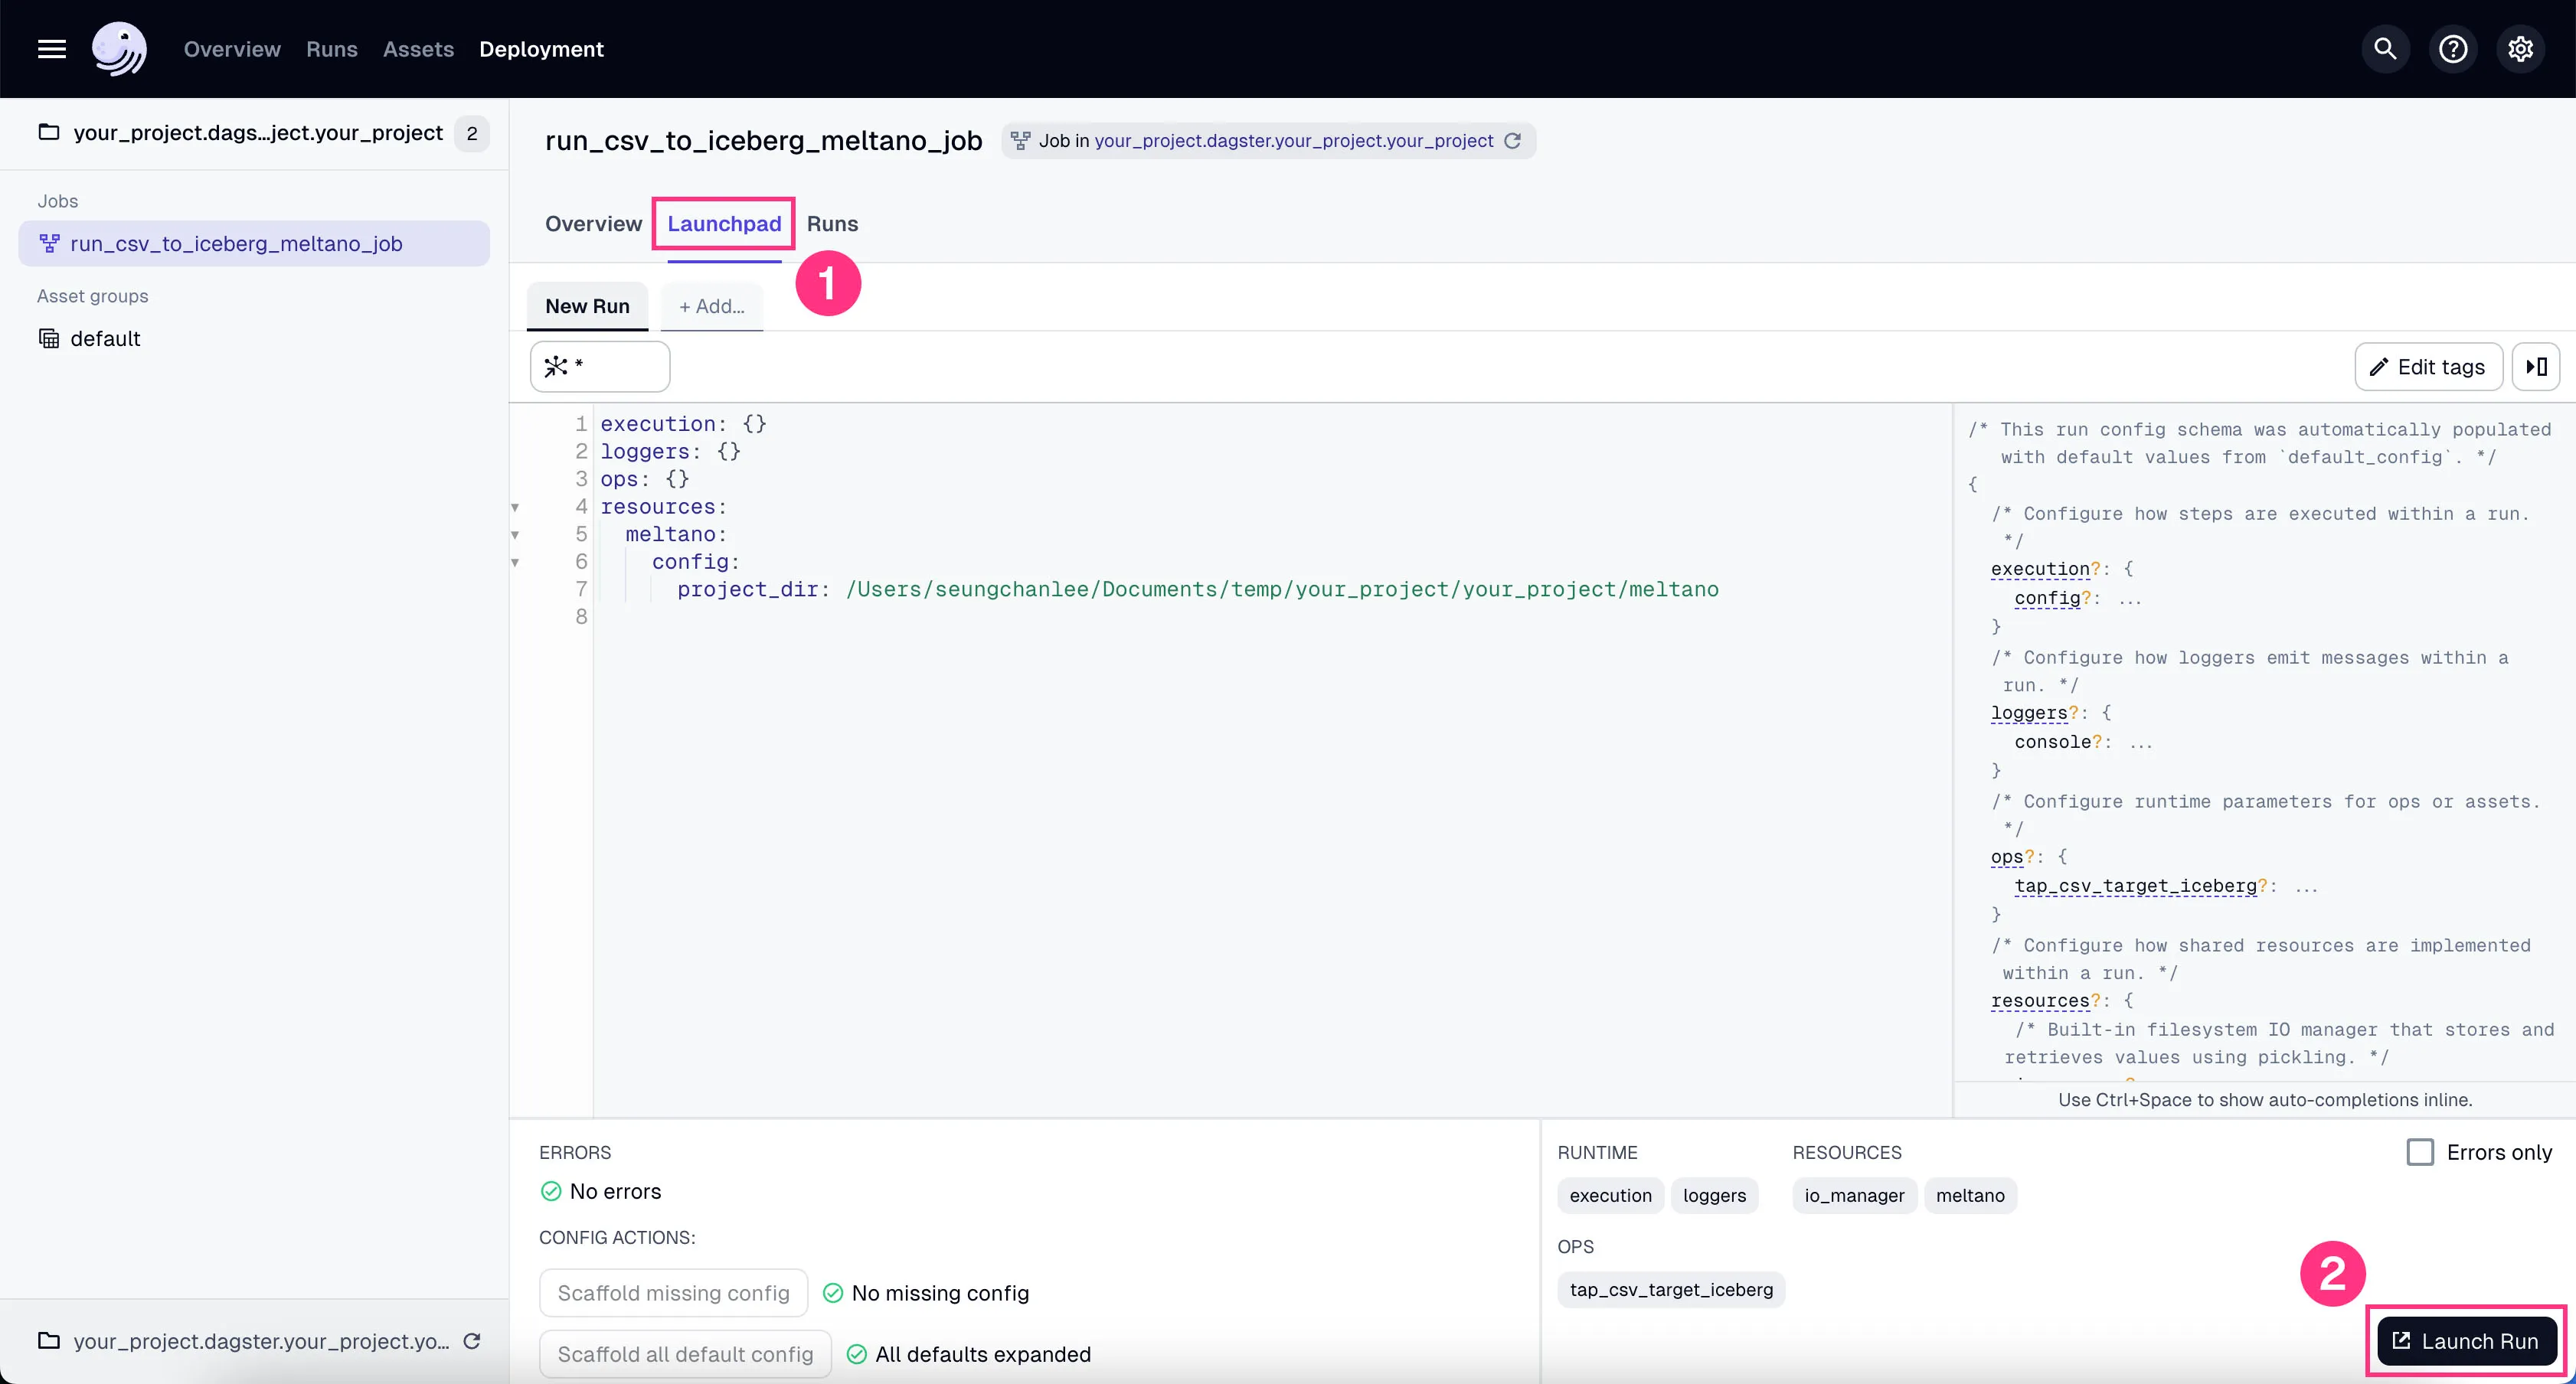
- Go to the tab “Launchpad” and click “Launch Run”.
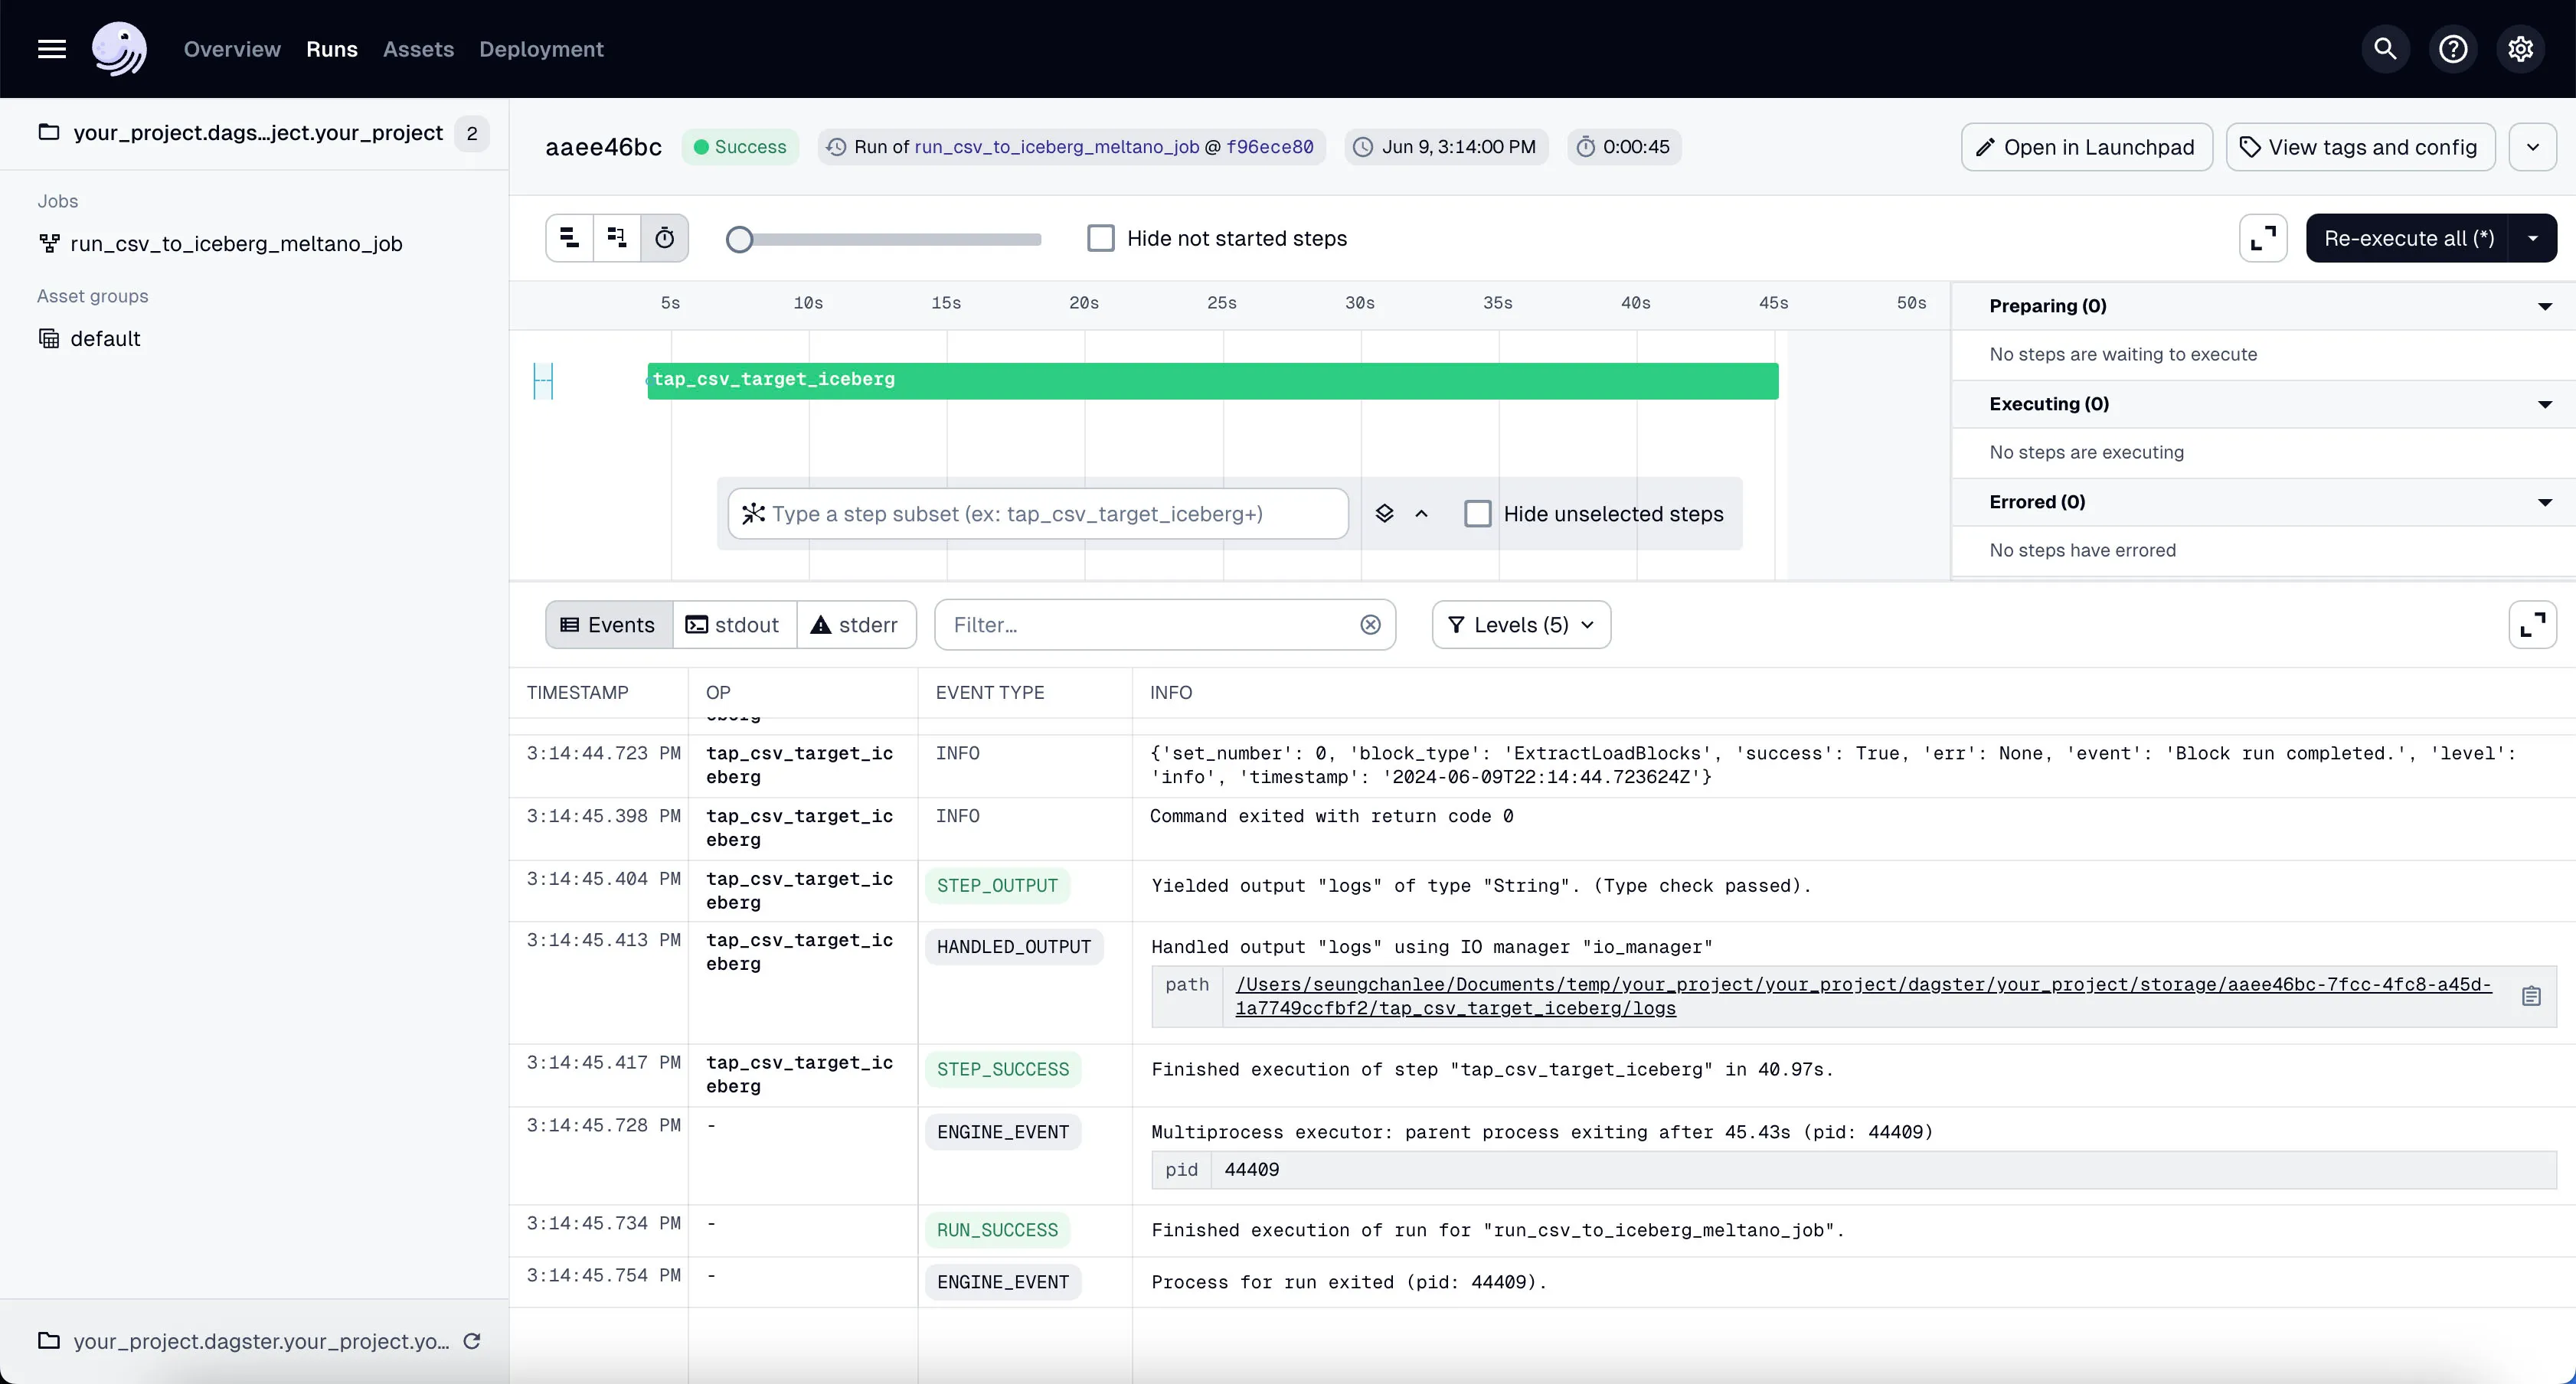
You’ll see the job starts running. It might take a couple of minutes to finish the ~100k rows of data we’re using in our example project.
To confirm that this worked correctly, you can go to Trino shell:
Then run the following query:
You should see the count of rows in the orders table.
 _col0
--------
 200000
(1 row)
See how there’s 200k rows now instead of 100k rows? That’s because we ran the Meltano job twice. Once manually during our Ingestion tutorial, and once via Dagster.
Run DBT Assets
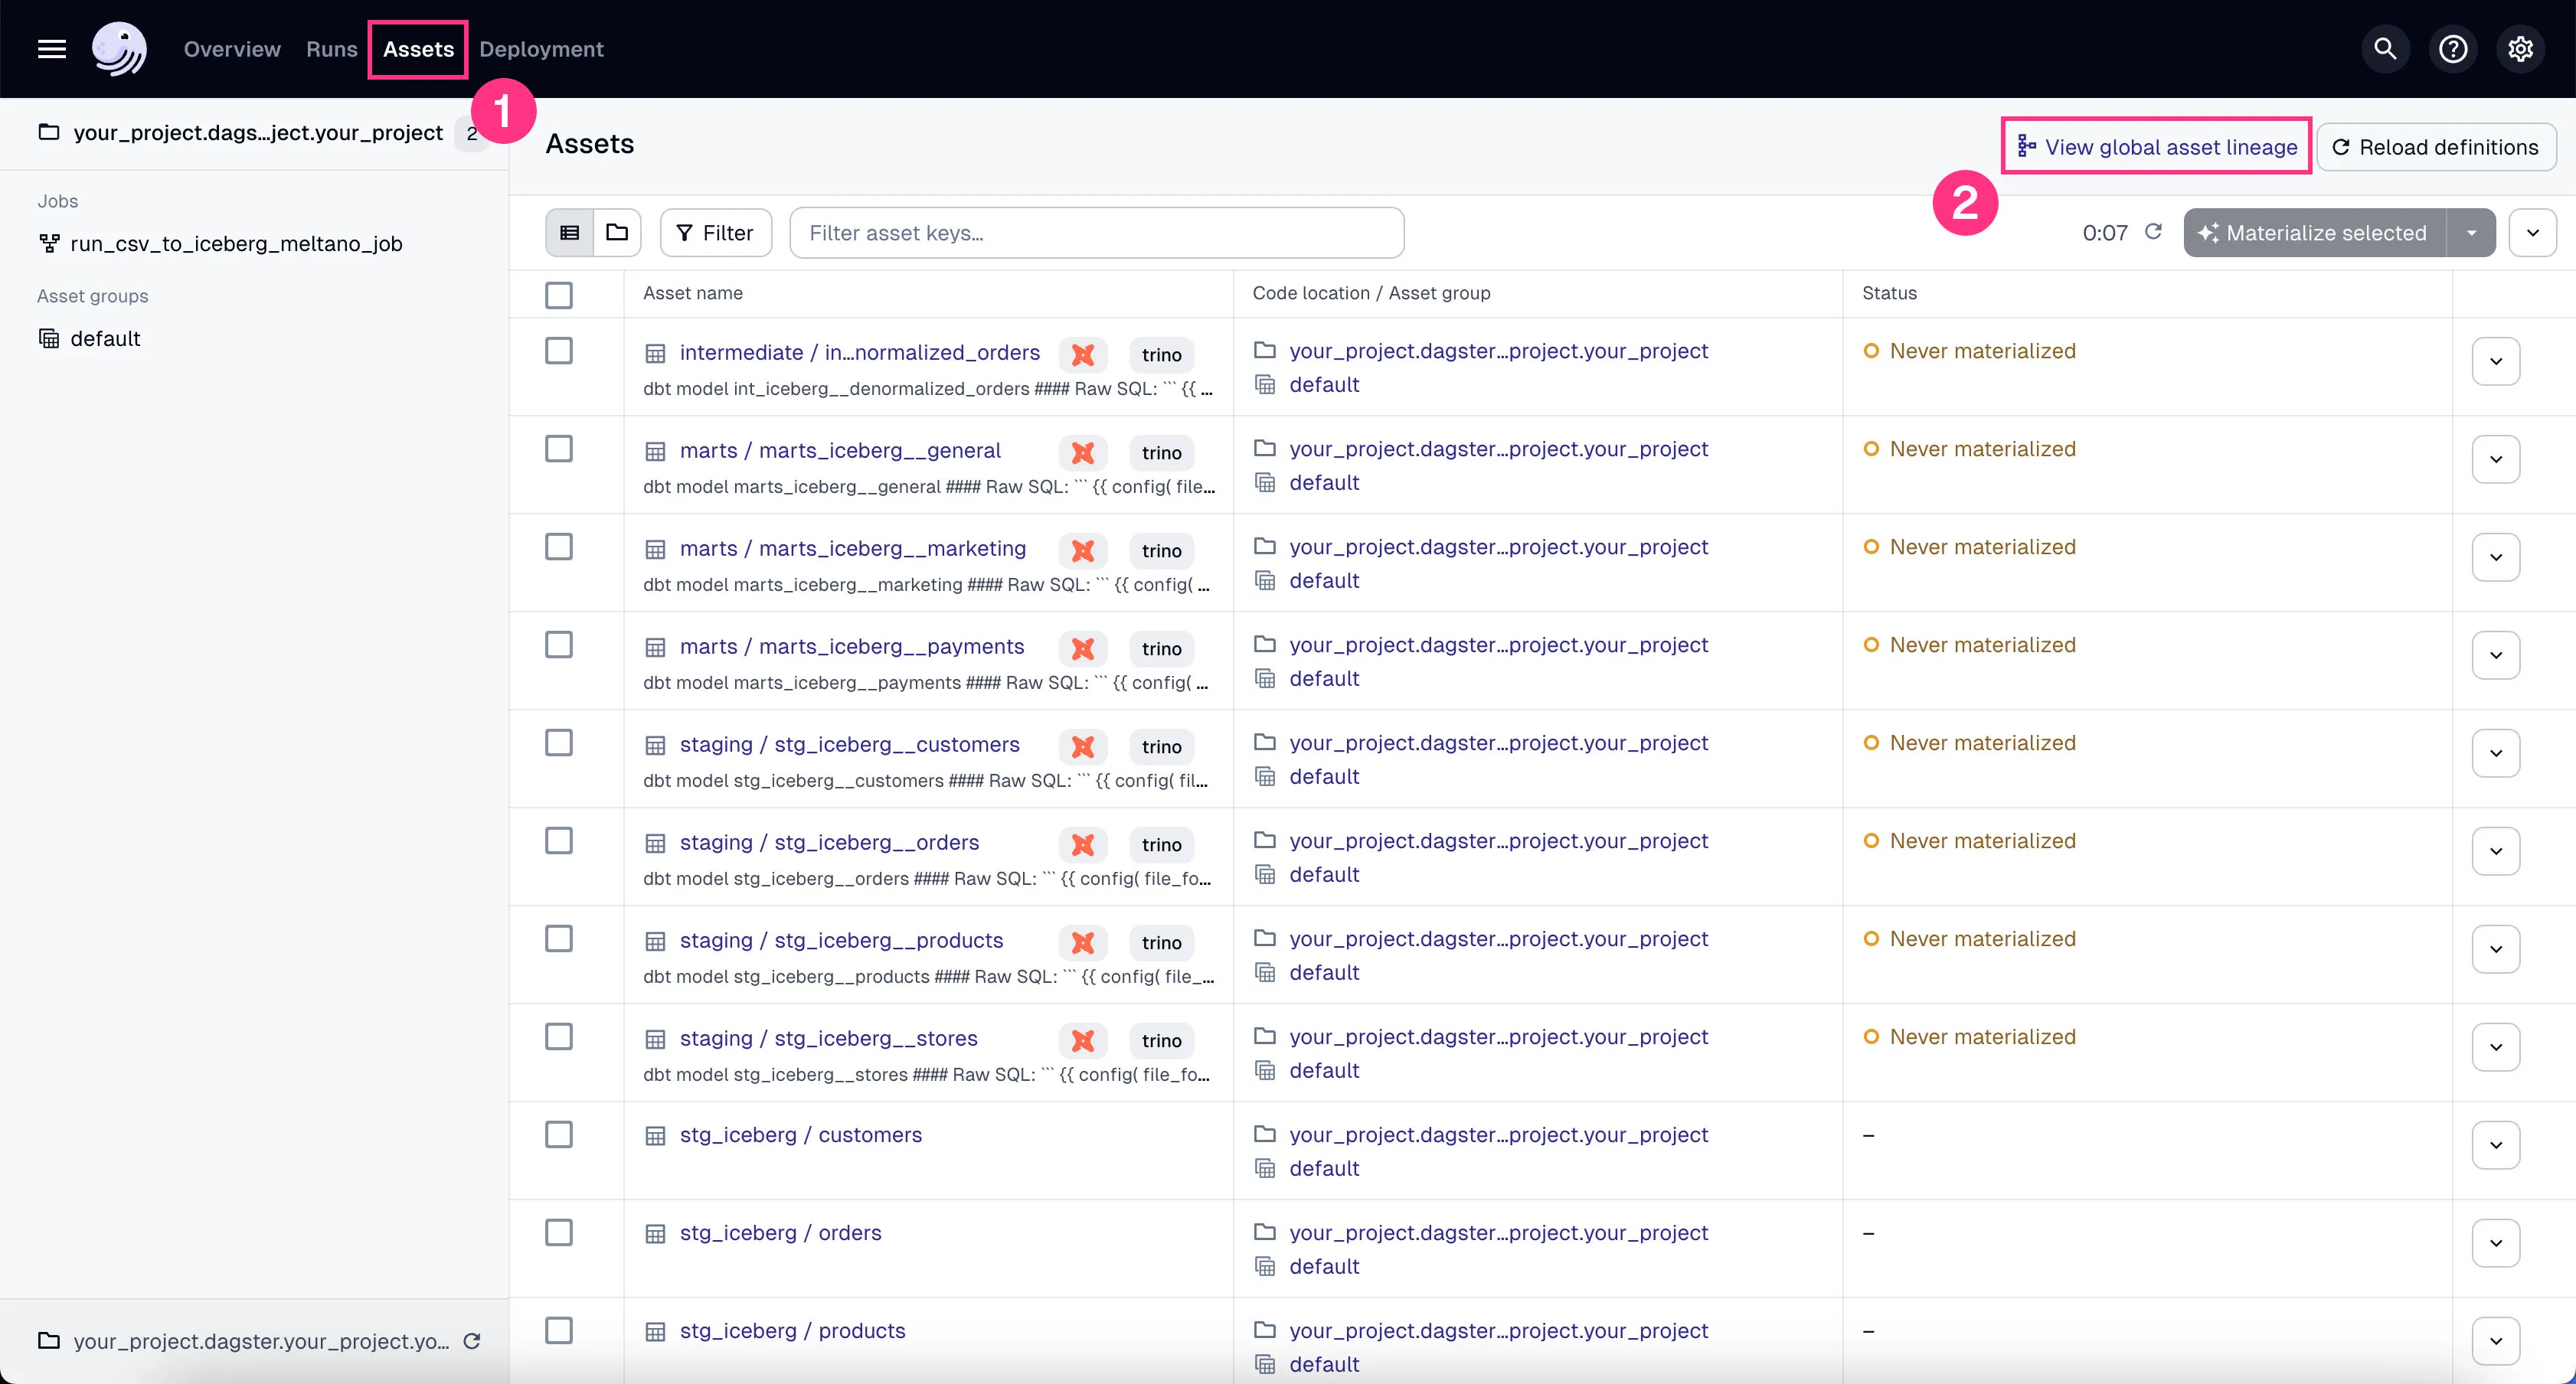
You should now be able to see all DBT assets in Global Asset Lineage section of the Dagster dashboard:
-
Click on the “Assets” in the top menu.
-
Click on “View global asset lineage” at the top right.
In the global asset lineage view, click “Materialize all” to execute the DBT transformations (underneath, Trino is executing these DBT queries). Of course, in a production environment, you might want to schedule them instead of manually triggering them.
If the materialization was successful, you should be able to query the tables in Trino:
Then run the following query:
 _col0
--------
 100000
(1 row)
Wait - why are there only 100k rows? Shouldn’t there be 200k rows? We’ve run DBT twice, once manually during our Transformation tutorial, and once via Dagster.
The reason is that we made the DBT staging models idempotent by deduping the data.
So even if we run the DBT job multiple times, the data with the same IDs won’t be duplicated - which is exactly what we wanted.
Clean Up
You can ctrl + c to stop the Dagster server and UI.
Also, you can stop and remove all the docker services:
Conclusion
In this post, we set up Dagster to orchestrate our data pipeline.
We connected Meltano and DBT to our Dagster project and ran the Meltano ingestion job and DBT transformations.
Also notice how nice it is to be able to view all the DBT models and their dependencies in one place - the Dagster UI. This is the power of orchestration.
In the next post, we’ll visualize the data we’ve been working on using Superset.
Stay tuned!
Questions and Feedback
If you have any questions or feedback, feel free to join us on Slack and we’ll do our best to help!